|
This post is not informative, inspirational, nor helpful in any way. It is simply to show off my beautiful, gorgeous new TABLE!!!! This is something hubby and I have been wanting/needing to do for a long time. Our old table was seriously the size of a desk. I got it at IKEA before Jordan and I got married. The whole set of four chairs and a table was $120. It worked at the time; I lived alone in a small one bedroom apartment. Then after we got married and bought a house, it still worked since it was just the two of us and our dining area was still relatively small. Now that we are in a bigger home and have a child, we need something larger and more practical (especially since two of the chairs broke, leaving us with two working chairs). We also want to be able to host get togethers with our friends from church, and our previous eating situation was not very guest friendly. As soon as I saw this farmhouse table from James + James, I knew it was the one. I love the classic look of the dark maple top and ivory base, and the farmhouse bench and x-back chairs compliment it perfectly! When hubby gave the OK to get it, I could NOT contain my excitement. I felt like this kid:  And this girl:  Then I found out it would be more than a month before I would receive this life-changing and spectacular table. So we waited. And waited. And then... IT CAME!!!! Here is our dining area before: 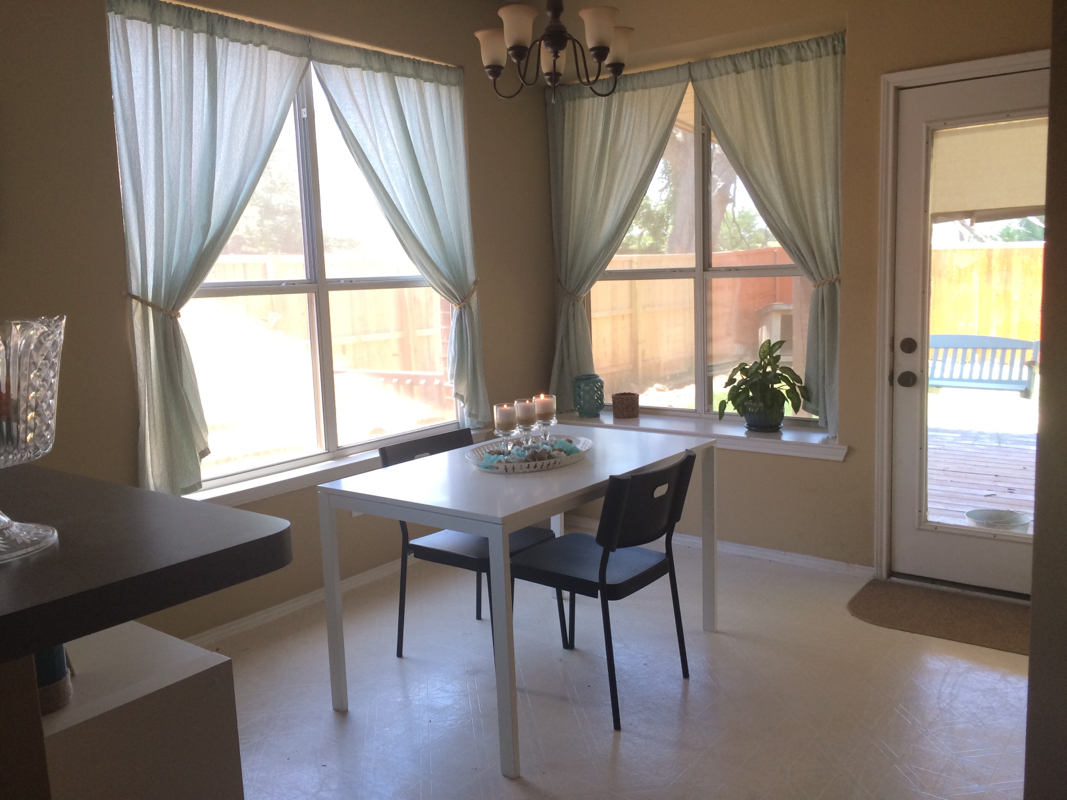 And here it is NOW: 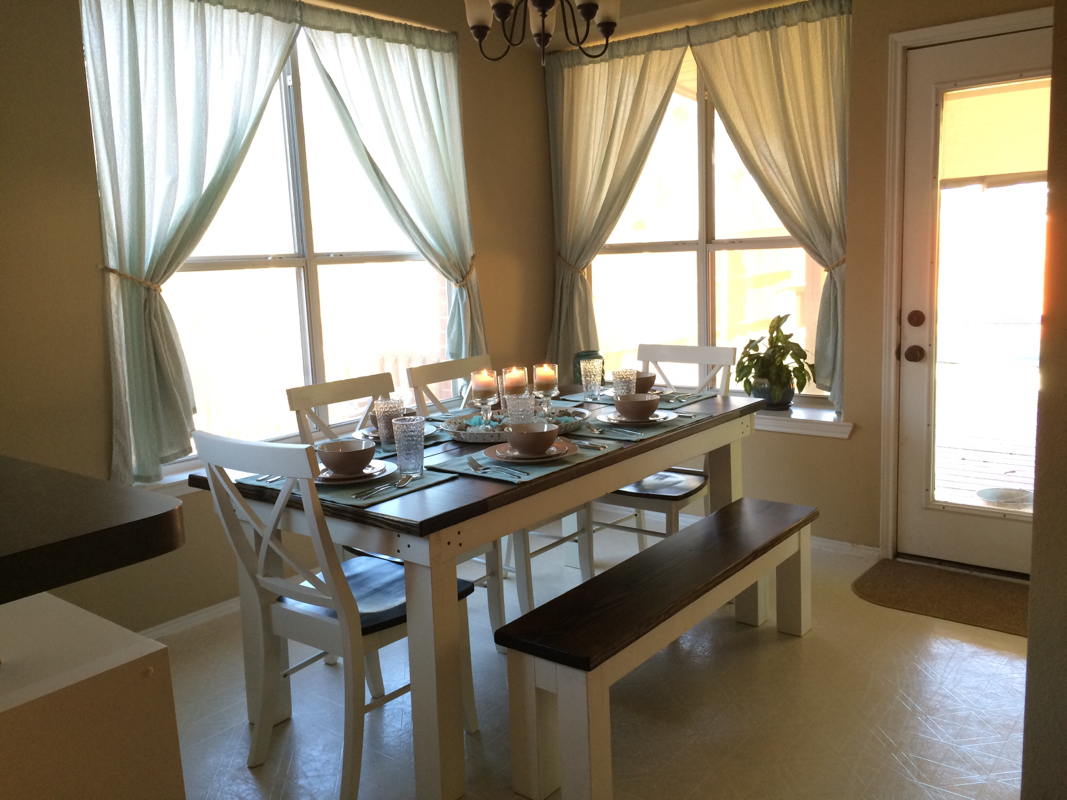 Before: 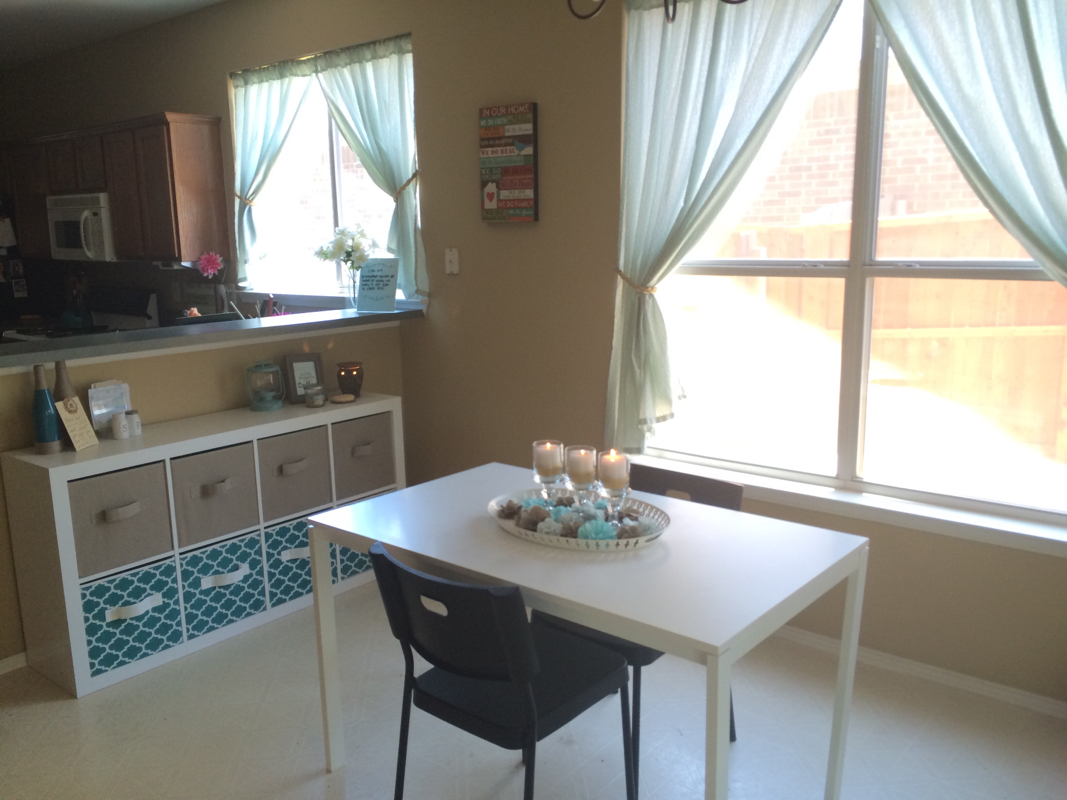 NOW: 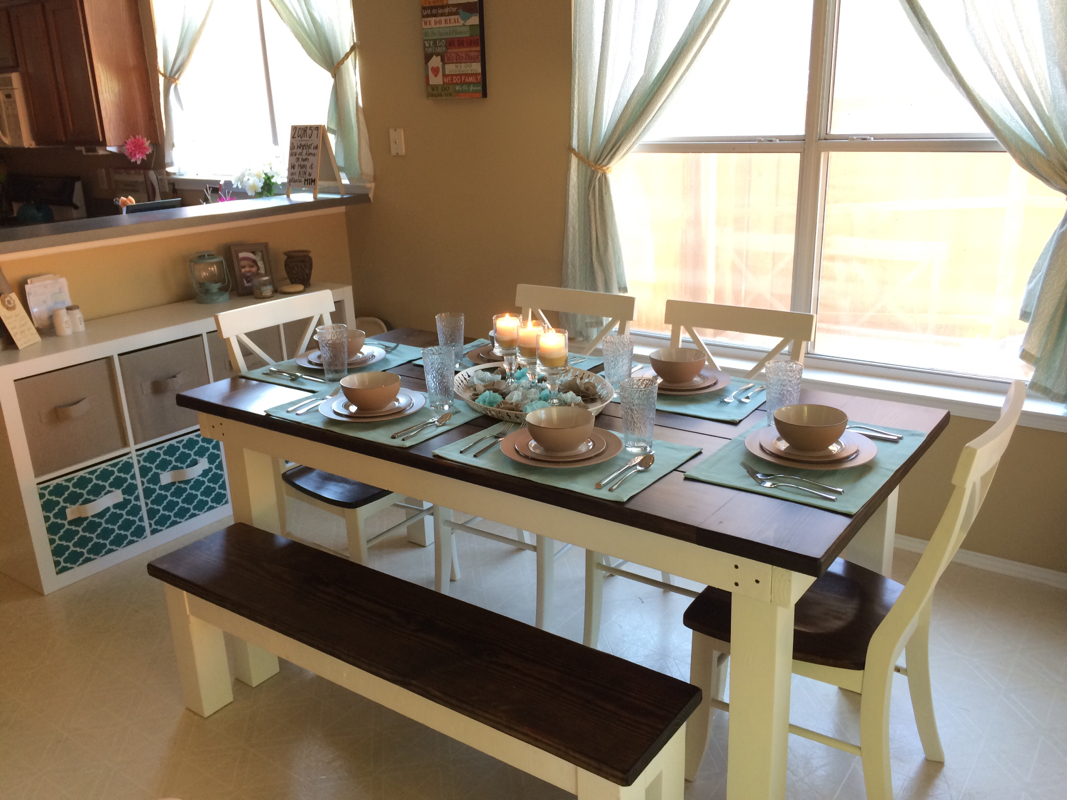 I am SO happy with the wonderful young men who delivered and set up the table. They were so friendly, polite, and professional. They were also very considerate of the fact that my daughter was already in bed and tried to be as quiet as possible. James + James exceeded all of my expectations and made the furniture buying process as pleasant of an experience as it could possibly be. They even killed a few wasps for me that made their way in the house while they were moving the table. This has been my favorite furniture purchase of all time. I am SO happy we decided to purchase from James + James instead of a chain store. Two thumbs up from me. 👍👍 I know it won't stay set so pretty all the time - with a baby, it's just not practical :( BUT I will make more of an effort to do it every once in a while, just for feel-goods. I have had this table for less than a day and I already can't imagine it being how it used to be anymore. If you need me, I'll be running around the house like this:  And this: 
0 Comments
 Long time, no see!! After what seems like an eternity, I have finally finished my next project for you! After spending hours...er..uh..a little while on Pinterest, looking at home decor ideas, I kept seeing coffee tables that look like farmhouse tables. I love farmhouse tables. So much so that we ordered a farmhouse table from James + James that will be delivered next week (!!!!), so while I was seeing all these matching coffee tables in gorgeous living rooms of homes that I will never be able to afford, I felt my envy growing. Especially since my feet were propped on our $20 IKEA table. It isn't the worst coffee table we could have; it does serve it's purpose well and looks half decent. However, we are in the process of trying to make our home feel more like the home we really want (so we won't be mildly embarrassed to have company). Here is what I'm working with: 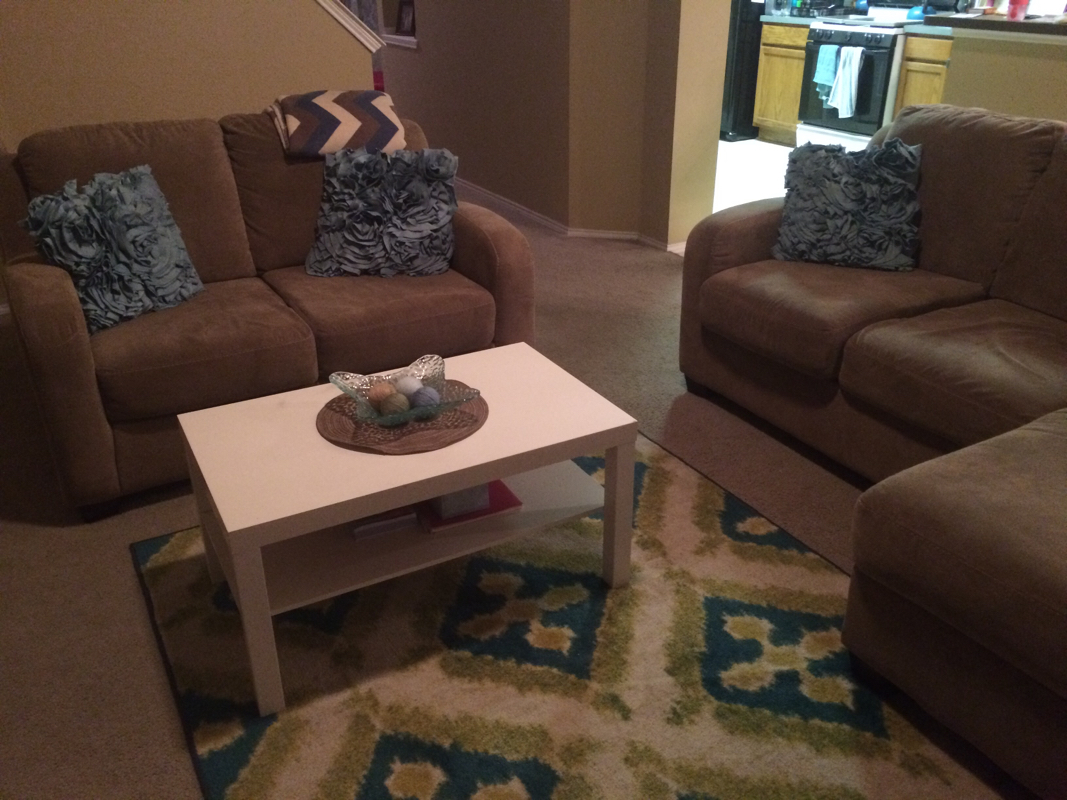 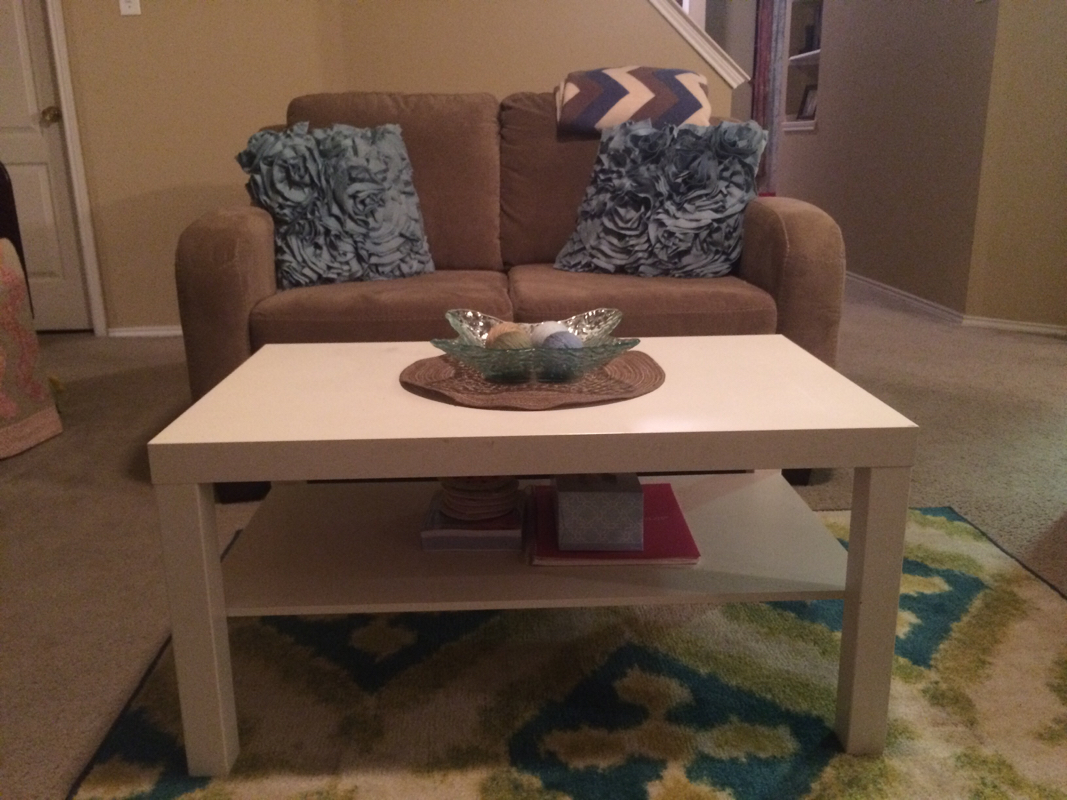 See? Not terrible, but not really the look we are going for. Since the kitchen table we ordered has a white base, I figured I could build on what we have - we are all about saving $$ where we can! I measured the table and took my terrible, childlike drawing/diagram to Lowe's to get some lumber. I got three 1x4s my first trip (for less than $2 each, y'all 👍). I had seven pieces cut to 29" and two pieces cut to 24". I got home and sanded all the pieces, then laid them out how I wanted them on the table........ 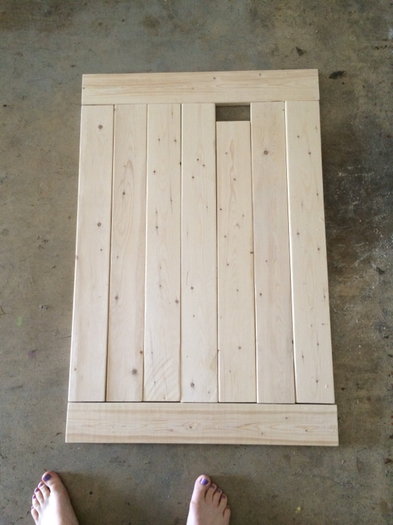 And THIS happened. 😡😤 27 ≠ 29. That's what happens when the old guy that normally runs the saw isn't there and there's a teenager in his place. That sentence made me feel old. BACK to Lowe's. Got another 1x4 cut to the correct 29", sanded it, and replaced the short piece. When it came to choosing a stain, I was overwhelmed by all the choices. I had picked out a pretty color and was about to accept it and walk away, when I saw this out of the corner of my eye. Our kitchen table top is being stained "Dark Walnut", so I just could not pass this up. The picture makes it look like a big can, but it's only 8 fl oz. This was about $5.  I bought a package of foam paint brushes from Walmart in the craft section. A package of twenty 2" brushes for under 2 bucks? Yes, please. Instead of trying to clean the stain out of the brush after each coat, I could just toss it in the trash. No futile efforts to clean oil based stain out of a brush sounded good to me. Seriously. Have you tried to do that? It's evil. And pointless. I needed a big work surface that could be left there for a few days while the staining and sealing process happened. Since we use both sides of the garage for cars, that was not an option. I decided to use the kitchen "table" (it's actually about the size of a desk, hence the reason we ordered a new one). I covered it with a tarp and a towel to absorb any messes. Since only the edge pieces have a chance of being seen on both sides, I only stained the top, ends, and edges of the rest. Brush it on, let it sit for a few minutes, wipe it off. Easy peezy. 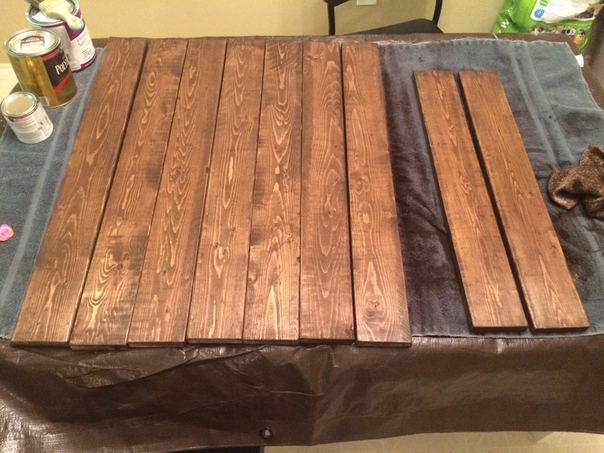 Isn't it preeeeetty? No wood would be ready to become a coffee table without being properly sealed. This can of polyurethane was about $8 at Walmart. There was a smaller can, but I opted for this medium size because I plan to use it for other projects. There are other finishes like gloss and semigloss. I chose satin because that is the finish our table will be. That is totally up to you which one you want to use. 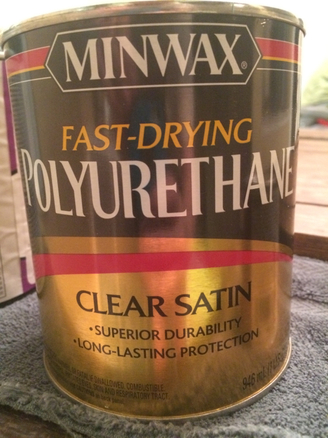 I did two coats of this on the bottom because it should all be sealed, even if you won't see it (helloooo spills!). Make sure to let it dry and sand all over between each coat. I waited a full 24 hours to let it fully dry before flipping over all the pieces to seal the tops. Then I did three coats on the top. NOTE: Don't be like me and forget to check for drips of the poly. When I was doing the backs, I accidentally left some drips on the edges that pooled up underneath, leaving a thick, dark glob on the front. If this does happen to you, just take a razor blade and GENTLY scrap off the dried glob. Put a little stain on your finger and rub it on the spot if you scrape off a little too much. All that's left is to put it together! I was all ready to start drilling screws in when my brother-in-law suggested drilling holes first to keep the wood from splitting. Duuhhhh Casey. Thanks, Dillon! After texting multiple pictures to my dad of the different drill bits we have, I finally decided on this one. 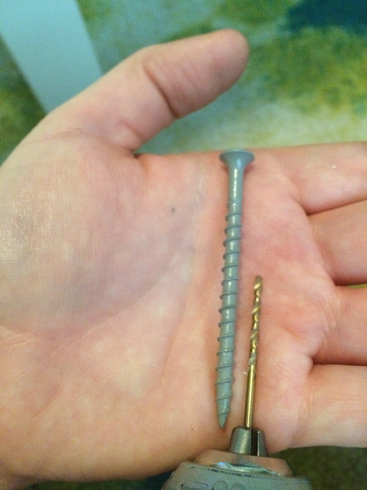 This is what took me so long to finish this project. After drilling about 6 of the 50 holes I needed, the drill battery died. Could I find the charger? Nope. Could hubby find the charger? Nope. Did we order a new one? You betcha. 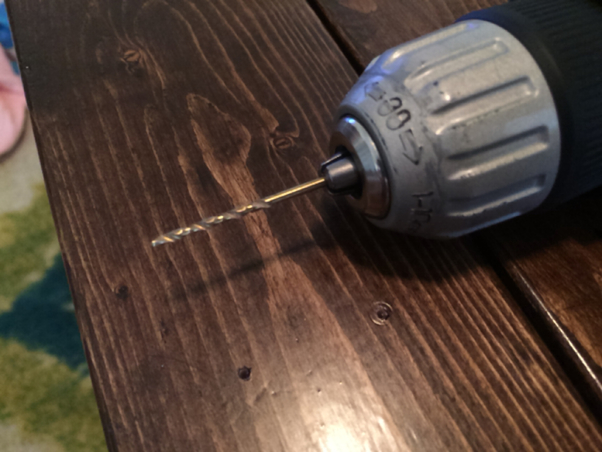 So after waiting a few days for the battery charger to arrive, I was FINALLY able to finish my beautiful new coffee table!! It isn't perfect, but I am pretty darn happy with it! 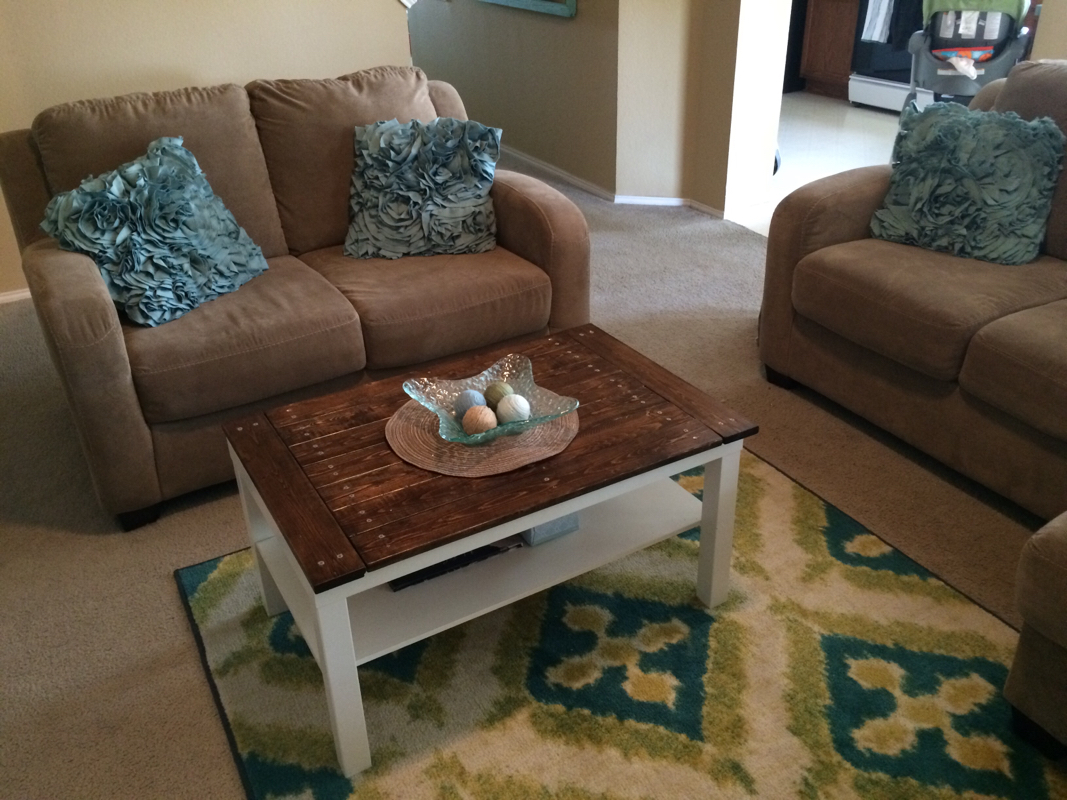 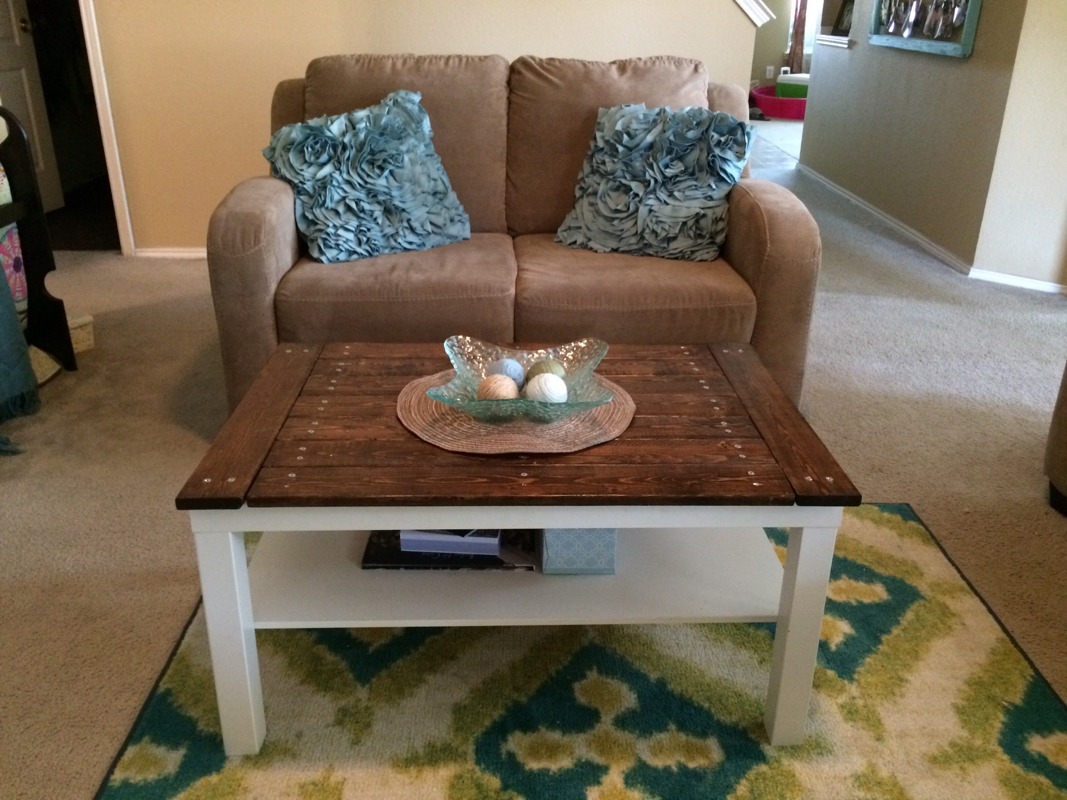 While waiting for the polyurethane to dry and for the drill charger to arrive, I had some time to work on a couple other projects. This one used to be an old window frame. All the little pieces that held the panes of glass in place had fallen out, leaving just the three long pieces. I painted it a pretty turquoise blue and distressed it with some sandpaper. Add some eye hooks, jute twine, clothespins, and photos and it's good to go!! I love how this turned out! 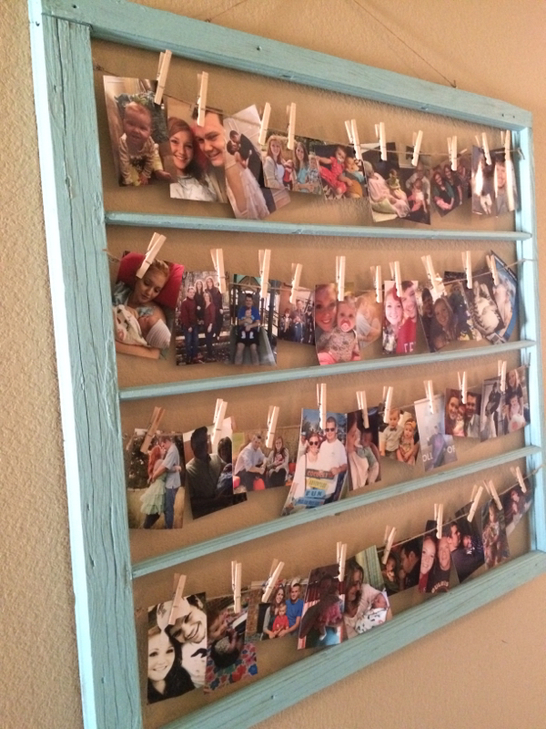 This next one is one that I have been wanting to do for a very long time. I have been dying to have a coffee bar. Well, a couple weeks ago, my wonderful and amazing husband bought me the perfect cabinet for it!! I was finally able to make the coffee and tea sign that's been in my head for so long. 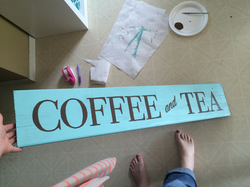 Tadaaa!!!!! To do the letters, I printed off what I wanted it to say, placed the letters where I wanted, and traced over them with a ball point pen - HARD. That left an impression in the wood that I was able to use as a guide to paint. I still have a few signs I'd like to make to put above the coffee makers to give it some color in that gap between the shelves, but here it is!! I. LOVE. IT. 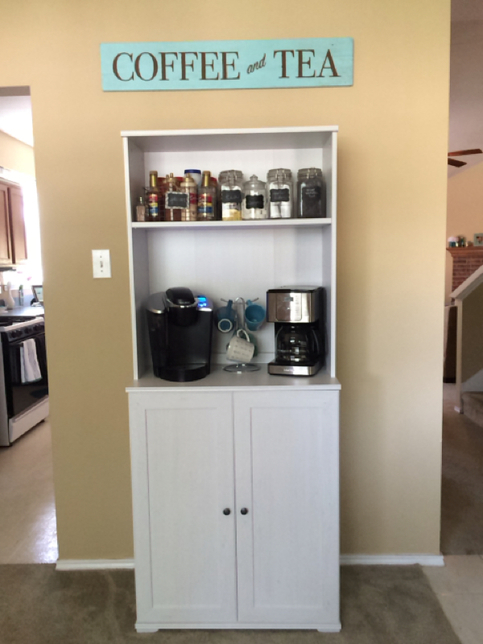 Well, K's nap time is very apparently over, as evidenced by the pterodactyl-like screeching I hear coming from her room, so that's all for now! I will post a before and after of our eating area as soon as our gorgeous new table is delivered!!!
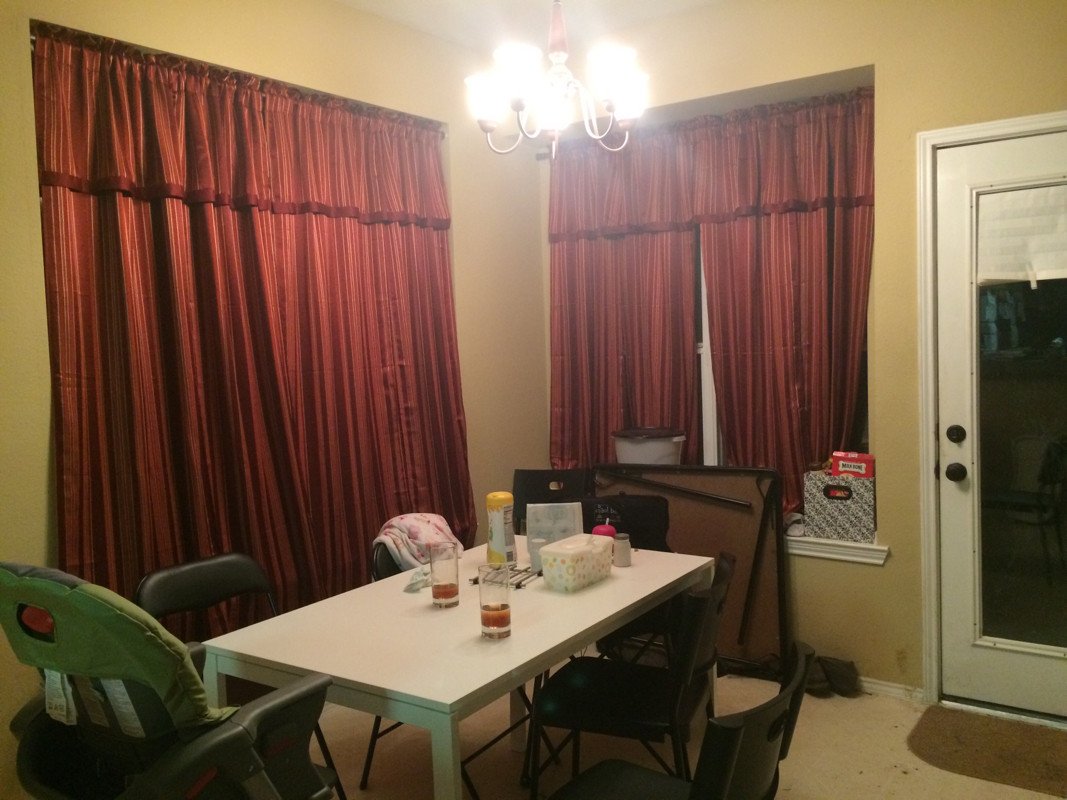
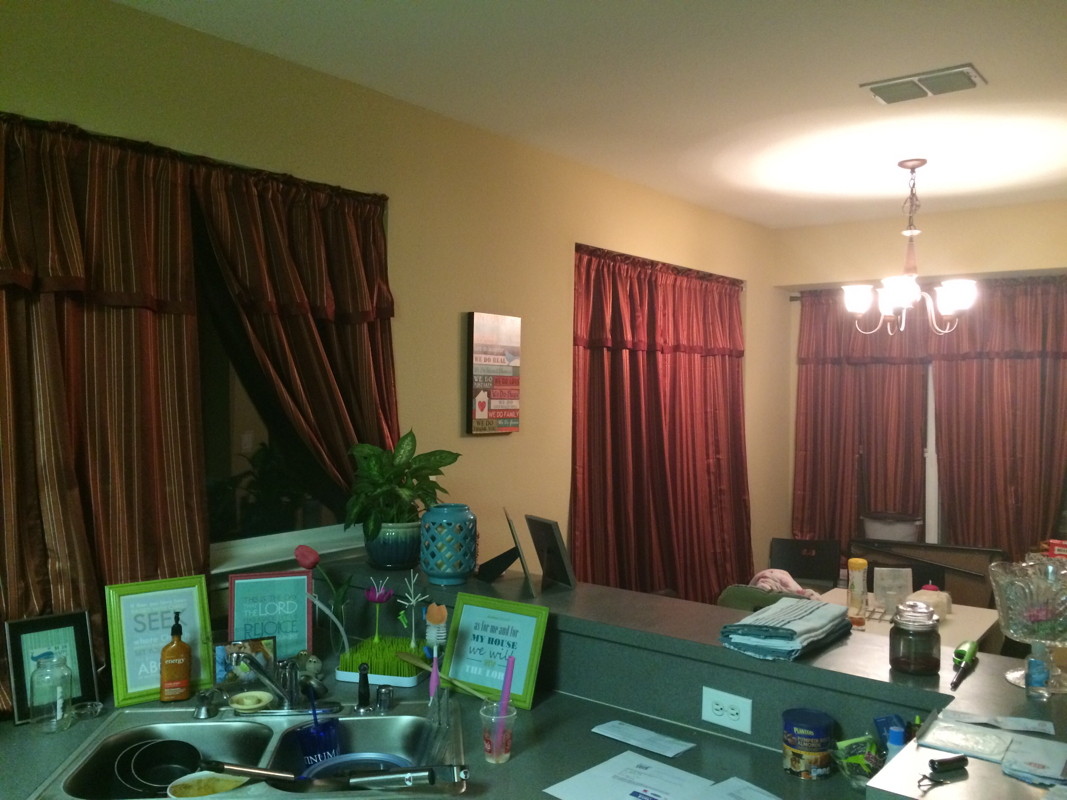
At the risk of sounding totally cheap, I'm going to tell you how I completely transformed our kitchen for twenty-five measly dollars. Yup. $25. (Not including the things I already had.) 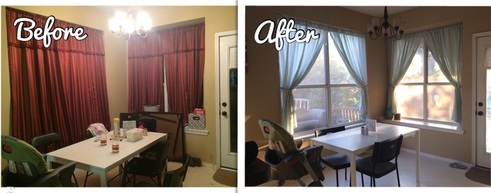 We are currently renting our house from my parents. When my parents moved out, they put these curtains in the kitchen so there would be something over the windows while the house was vacant and being shown to potential buyers. Blah, blah, blah, time goes by, things happen, then we moved in early last year. In our previous home, there were no substantial windows in our kitchen. Just a small one over the sink that had blinds and didn't require a curtain, so we had nothing to replace the red fortune teller booth curtains left in this home and no budget to get any. So I left them. They match n.o.t.h.i.n.g. that I own, but I left them because the windows needed to be covered and they were sufficiently doing that job. Here is what our kitchen looked like last night:
Sorry, mom! I love you! We have really been wanting to fix this place up to make it more our style and presentable for company, so thinking of new ways to do so with very little money has been occupying a lot of my mind lately. This week, my sweet Memaw sent me some money for taking pictures at her wedding earlier this month. I knew exactly what I wanted to do with it! I had picked out some perfect curtains for $22 per panel on Amazon and was reluctantly about to place my order when I remembered seeing a tip on Pinterest about using bedsheets as curtains. Boy did that get my creative little brain going. To Walmart! After a lot of browsing, discussing with the hubby, and fishing the grocery list out of my 7 month old's mouth, I finally decided on the perfect sheets for my curtains! 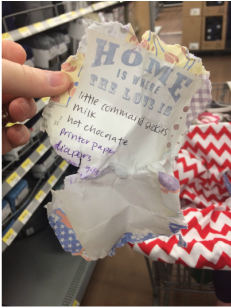 Mmmmmm.. Paper! Since there are three windows, I needed six panels. However, my store only had five. Until I can get my hands on a sixth one, I decided to go ahead and make it work with just the five for now. These are just twin size flat sheets. They are $5 each, y'all. Five. Dollars. That's less than a meal at most fast food places. Score. 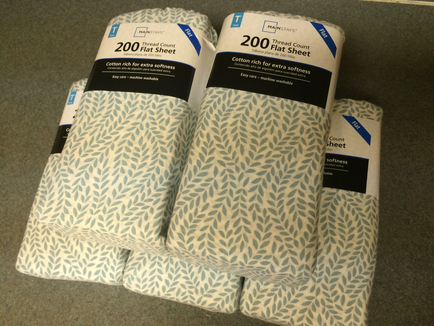 And you can't have curtains without tie backs. I just happened to have this stuff on hand to whip something up with. Rope, jute twine, and little command hooks. 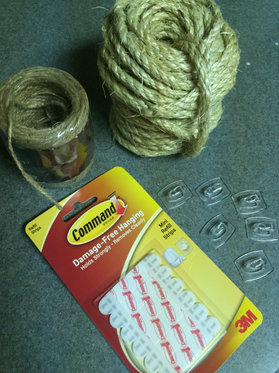 To make the tie backs, just cut the rope to the length you want. I wanted to braid mine, so I cut 3 pieces for each tie back, so 18 pieces total. I hot glued the ends together on one side, then wrapped it with the jute, making a loop to hang it with, hot gluing everything in place. 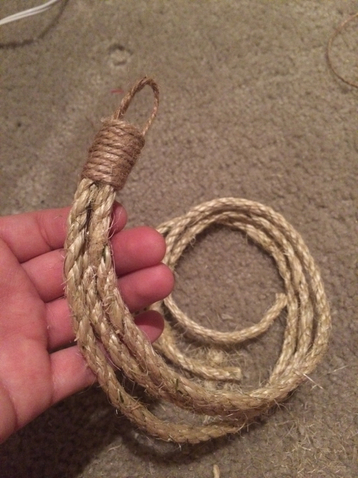 Using a highly dignified method, I braided the three pieces together, then finished the other end the same way as the beginning. 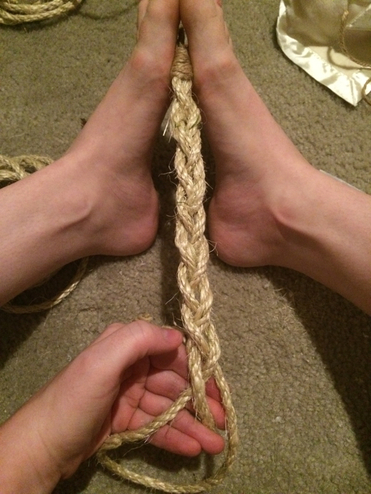 Do that to all of them. If you don't want them braided, you can just wrap the jute the same way around a single piece of rope or however you want to do it. The result: 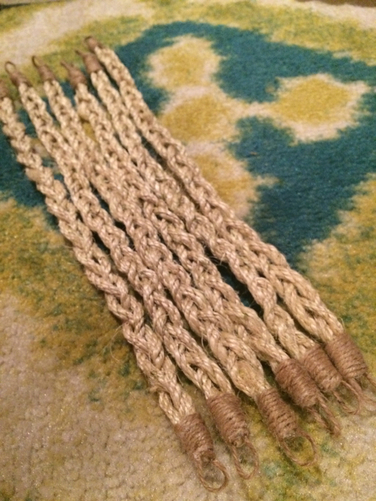 Yay tie backs! Now for the main event: the curtains! I was going to fold over the top and stitch to create a casing for the curtain rod to go through, but once I opened the sheets, I noticed the top hem was totally big enough to fit a curtain rod through. So I cut an opening in the back on each side, making sure to only cut the back layer. I found it easiest to start the hole with a seam ripper, then finish it with scissors. 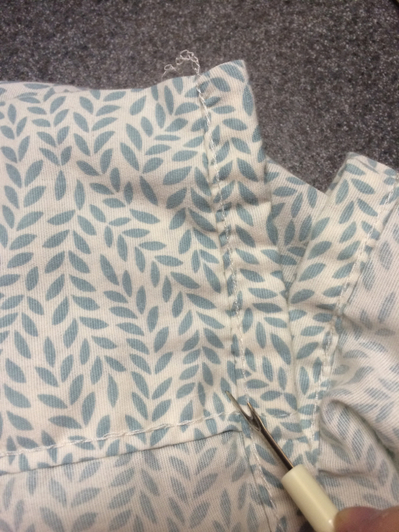 Cut riiiiiiiiiight there. Then I zigzag stitched over that raw edge just because I'm OCD and don't want any possible fraying down the road. 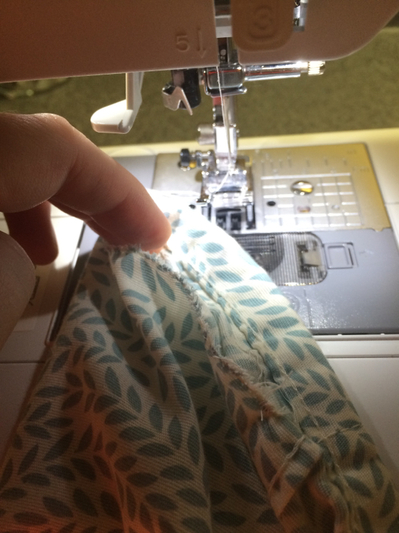 After the tops of all the panels were done, I hung them and pinned where I wanted the bottom to be. I used the edge of the windowsill as a guide. 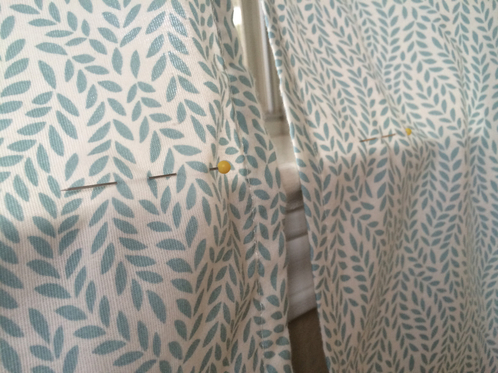 Pin pin pin pin pin Now just to hem up the bottoms. I laid out each panel and ironed the bottom crease. Then I cut 2 inches past that to create a 1 inch hem.  Whirrrrr All done!! To say I am happy with the final product is a serious understatement. 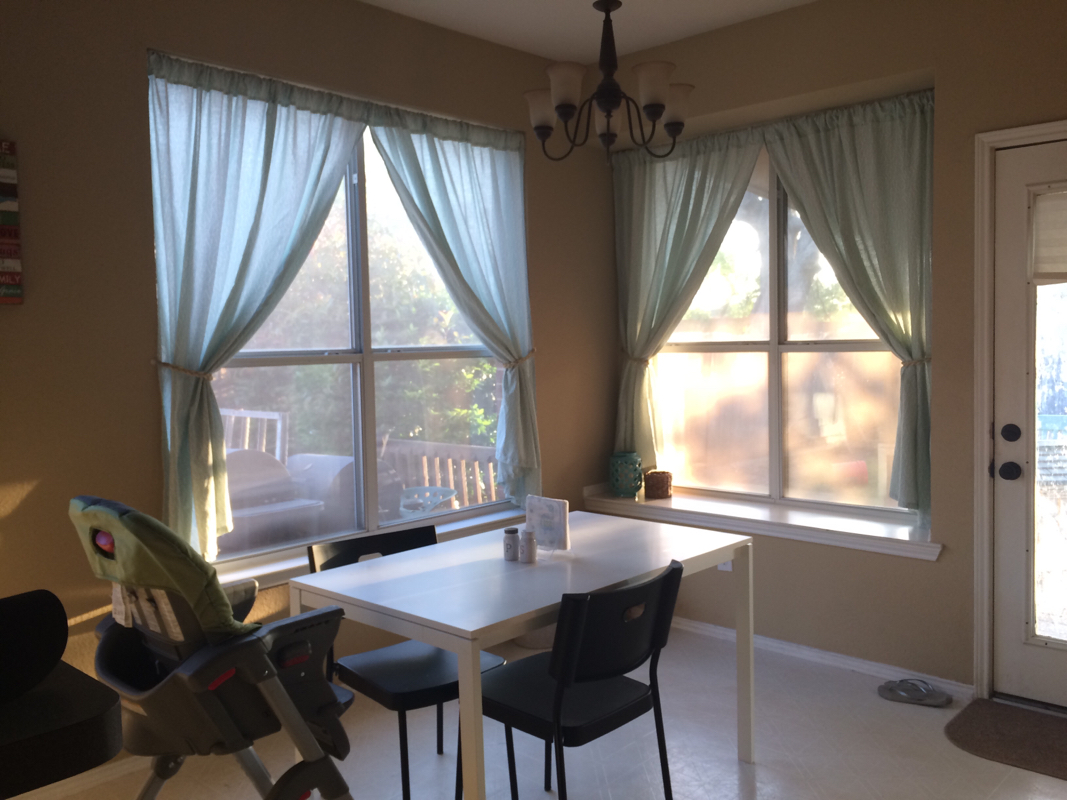 As soon as I get another sheet, the window over the sink will look the same as the other two. This is my "making it work in the meantime" curtain.  Why didn't I think to move the dishes out of the picture? Meh. Oh well. You're all humans too! Here is a close up of the tie backs: 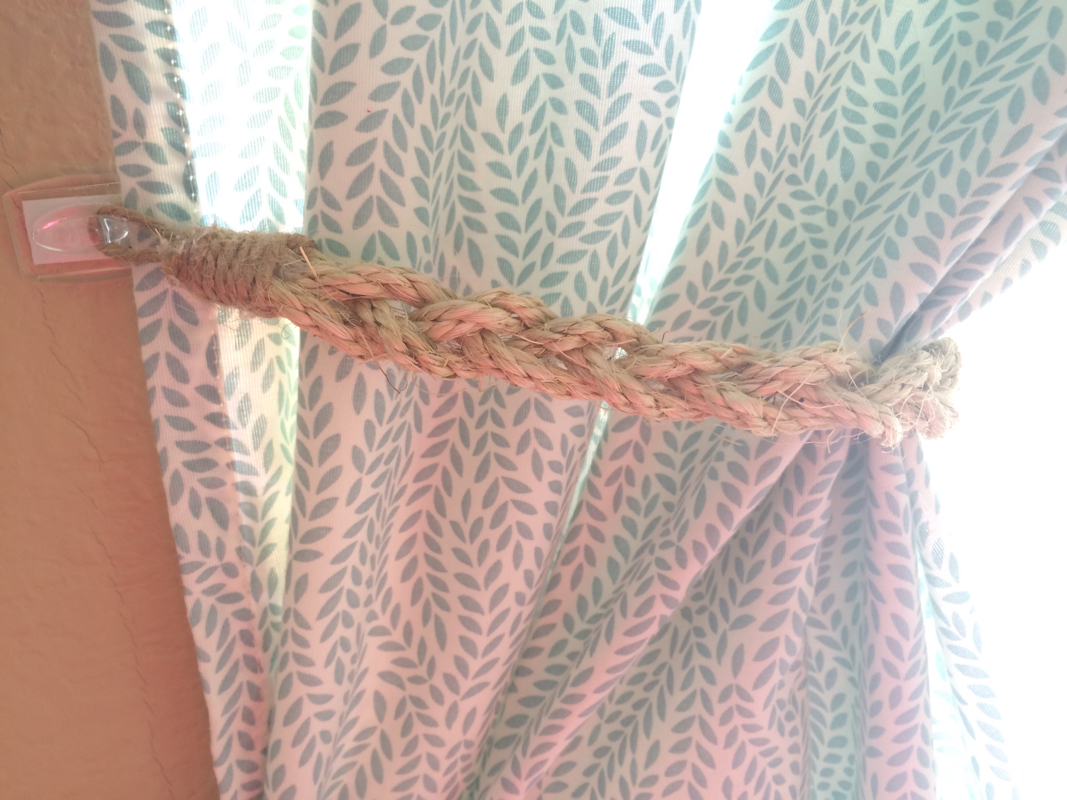 I am so beyond thrilled with this transformation!! Best $25 ever spent. Ever. Before: 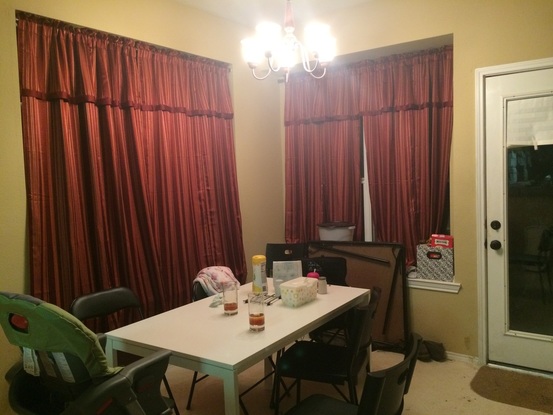 After:  Now all that's left is to get a real dining table with more than two chairs... 😁
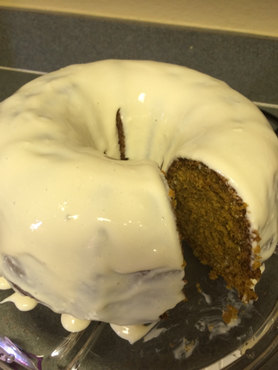
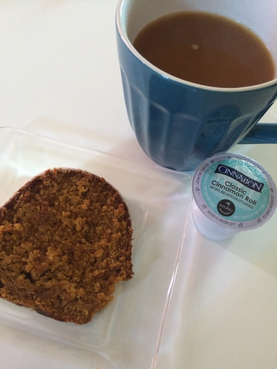
Happy crafting!! Who says it has to be autumn to enjoy the wonderful deliciousness that is pumpkin? No one. That's who. As I've mentioned before, we have a binder of our family favorite recipes. There are a few desserts in there, but I don't bake very often. This one, though, is worth every calorie. And everyone that knows me knows that I live for pumpkin flavored everything! This is my favorite pumpkin bread recipe. It's actually a cake... but if I call it a bread, it sounds healthier, right? That's what I'm going with. 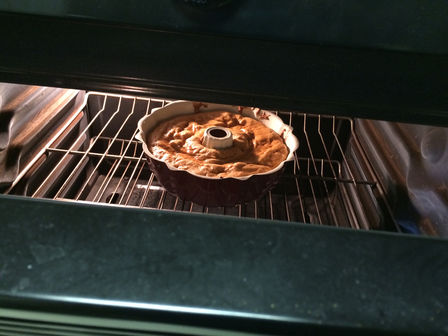 Mmmmm....  All that's left is to slice, make a cup of Cinnabon coffee, and enjoy!
What are some of your favorite recipes to make, even in the wrong season?
Since before K was born, I'd seen moms pushing around shopping carts with fun covers over the icky baby seats and looked forward to the day I would get to pimp my kid's ride around the grocery store. I was not about to buy one, though! I've got a sewing machine and a strong will - plus those things can get stupid expensive! So once K was able to start sitting up in shopping carts and highchairs, I couldn't wait to put my handy skills to work. After much searching, I found this tutorial on Pinterest and headed straight to Hobby Lobby (in a ridiculous thunderstorm, I might add). After browsing hundreds of fabrics, walking up and down the tiny, narrow fabric aisles more than a few too many times, and politely smiling at the many redhead-baby-gawking passersby, I finally made my decision. Did my college alma mater influence my decision? Yes. (Wreck 'em Tech!) I made a few modifications to the pattern to make it completely reversible with a different print on each side. There was also an adjustment on how I inserted the elastic, but that was hardly on purpose. A few hours later, I had my finished product! And of course I had to go try it out, so I went to the store for more thread. Any excuse to get a picture of a cute baby in a fun, tricked out shopping cart, right?  Crazy hair, don't care! Okay.. maybe mommy cares a little bit *hides face*  Grey and white polka dots on the other side After fussing a bit with the seatbelt straps (which K still needs for a little extra stability), I decided to add some big buttonholes in the back when I got home for the straps to go through. My buttonhole foot on my machine only goes up to 1 1/8", so I made those suckers the old fashioned way - zigzag down, a few long stitches sideways, zigzag back up, a few more long stitches sideways, and pray that you don't have to pick out all those tiny little stitches with a seam ripper because you measured the length wrong and made it half an inch too short. Trust me. It still hurts to think about. 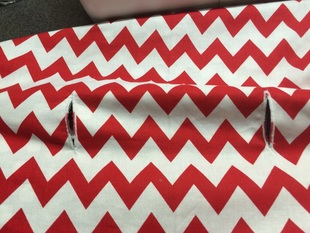 Manually made buttonholes! I will also probably go back and add a little loop on the front of each side to clip a toy onto. So there you have it, a clean, cute shopping cart, a healthy baby, and a happy mommy! 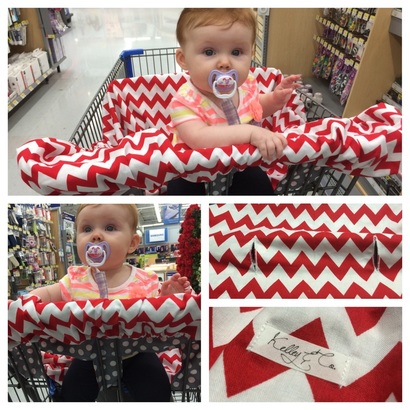 Check out my Facebook page here!  That's all I've got for now! Thanks for stopping by :)
As a child, I HATED crime shows. They gave me nightmares. I was (and still am) a big over-thinker. As I entered my mid-late teens, however, that changed. I LOVED them. I could watch the goriest of crime scenes with utter fascination. I own at least 10 seasons of CSI: Crime Scene Investigation (the Vegas one and the best one) and would frequently binge on them with my mom. Then I got busy with college and marriage, and those DVDs got pushed to the back of the movie closet, replaced by witty comedies and family friendly, feel good flicks. I lost my tolerance for blood and guts and bad guys and autopsies and maggot infested bodies. Okay, that's fine with me. So I get a bit queasy during a couple scenes of movies and shows that I rarely watch? No biggie. Then.. I had a baby and EVERYTHING changed. I became a fraidy cat mom. Yup, THAT one. The one that won't open the door when the doorbell rings. The one that doesn't go on walks outside with her daughter. The one that isn't allowed to watch the news because of the scary thoughts it puts in her head. The one that doesn't like to drive because of the paralyzing fear that something will go wrong. The one that knows that this world is full of evil and lets it get to her. Satan really knows how to get us, doesn't he? By inspiring all the evil of the world, he has me quaking in my sparkly, metaphorical boots, doing one of the things that God has told me over and over NOT to do! “Therefore do not be anxious about tomorrow, for tomorrow will be anxious for itself. Sufficient for the day is its own trouble." (Matthew 6:34) “Therefore I tell you, do not be anxious about your life, what you will eat or what you will drink, nor about your body, what you will put on. Is not life more than food, and the body more than clothing? Look at the birds of the air: they neither sow nor reap nor gather into barns, and yet your heavenly Father feeds them. Are you not of more value than they? And which of you by being anxious can add a single hour to his span of life?" (Matthew 6:25-27) "Fear not, for I am with you; be not dismayed, for I am your God; I will strengthen you, I will help you, I will uphold you with my righteous right hand." (Isaiah 41:10) "Do not be anxious about anything, but in everything by prayer and supplication with thanksgiving let your requests be made known to God. And the peace of God, which surpasses all understanding, will guard your hearts and your minds in Christ Jesus." (Philippians 4:6-7) “Let not your hearts be troubled. Believe in God; believe also in me." (John 14:1) "Be strong and courageous. Do not fear or be in dread of them, for it is the Lord your God who goes with you. He will not leave you or forsake you.” (Deuteronomy 31:6) "...Let not your hearts be troubled, neither let them be afraid." (John 14:27) There's so many more, but you get the idea. Kinda hard to argue with all that. When I skip the walk to the mailbox because I'm irrationally afraid that a drive-by shooting, crouching kidnapper, or freak car accident will leave my child motherless, I let the devil win. I'm not trusting God. I always strive to live my life according to His word, but am I really? I try to do everything right - I am and always have been a well-behaved, rule following, bible class going girl - but kinda like speed limits, sometimes we don't think His command to not worry is that important. I always say, "If God found it important enough to say, I better find it important enough to follow." The same should be applied to worry. While some of my issues are actual legitimate fears and not just worries, I am resolving to work on them. Because God doesn't want me to worry. God wants me to be happy, just like He wants for everyone else. He wouldn't allow me to have this struggle if He didn't want me to overcome it - He knows I can. In Him, I can. "He will cover you with his feathers, and under his wings you will find refuge; his faithfulness will be your shield and rampart." Psalm 91:4 That's enough for me. So I am jumping in. I said a prayer and took my girl for a walk around the neighborhood today, and guess what? I'm still here to tell the tale! It was so much fun to be able to exercise and spend time in God's beautiful creation with K, I almost forgot about my irrational worries and fears. Almost. I am still a protective mother, after all. But it was at a healthy level, not the paralyzing, house-confining, hermit status level it was before. So here's to the playground going, neighborhood walking, mail getting, and grocery shopping that's now in our future!
This has been a bit of a revealing post, and I'm quite sure some of you will look at me differently from now on, but I say all this to say that no matter your struggle, you can find solace in the Lord. He wants you to have peace, He wants you to be happy, and He wants you to trust Him. Just spend some time in His word and you'll find what you need - maybe not what you're looking for, but what you need. Whatever it is you're facing, see what God says about it and jump in. And then get yourself a brownie because you're awesome.
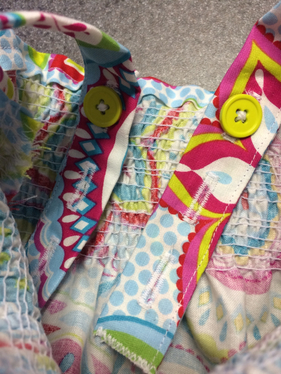
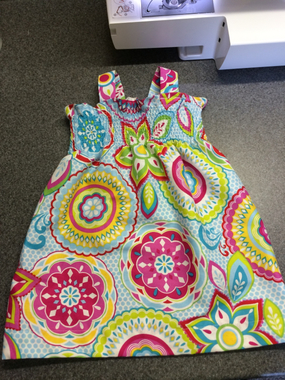
"Cast your cares on the Lord and He will sustain you; He will never let the righteous be shaken." (Psalm 55:22) "The Lord is my strength and my song, and He has become my salvation; this is my God, and I will praise Him, my father's God, and I will exalt Him." (Exodus 15:2)  Hobby Lobby!! Hobby Lobby!! Earlier this week, as my princess was napping peacefully in my arms, I was browsing Pinterest on my phone as I usually do. I came across this tutorial for shirring. I had never heard that word before. Never ever. But apparently it's a thing and everyone but me knows about it. Turns out, it's smocking with elastic thread. Blam-o. As soon as I started reading how to do this awesome new-to-me technique, I knew I HAD to make a fun summery dress for K. I found myself at Hobby Lobby today, finishing up hubby's Father's Day present (I know, I know. I'm mad at myself for finishing it so early - it's so GOOD and I have to hide it for so long! Will post about it later) and I saw THE perfect fabric for the dress. I have a hard time passing up a good fabric that's on sale, so it came home with us to sacrifice itself in the name of summer on my sewing table. After a few trial and error attempts, some machine and bobbin adjustments, and several scrap pieces later, I finally had it down. (If you are doing this for the first time, do a few test runs on scrap fabric - trust me.) I cut my fabric according to the tutorial, hemmed the top, and started shirring! After I shirred the desired amount of rows, I finished the side seam and hemmed the bottom to the desired length. Then made some straps with button holes (adjustable straps = ❤️) and viola!!
Not bad for one night's work! If you're looking for a super easy, adorable dress to make for your little princess or just want to learn a new technique (I mainly said that last part because I'm holding out hope that someone out there is like me and didn't know what in the world shirring was!!), head on over to the Make It Love It page and give it a try!

As I sit here with my sleeping princess on my chest, browsing Pinterest, reading articles written by "experts" and other know-it-all moms about how that simple thing is bad for my daughter.
"Holding her while she naps will create bad habits..." "She needs to learn to nap on her own..." "She will never be able to self-soothe..." Blah, blah, blah. What those "experts" don't know.. I hold K for almost ALL of her naps. And you know what? My daughter CAN nap on her own, she CAN self-soothe, and she had a PERFECT night last night - went to bed easy without fussing for a single second, slept all night, and played quietly in her crib after she woke up until I came to get her. I hold K because I WANT to, not because she has a bad habit or because she needs it. My husband works hard so I can have this opportunity. I am a stay-at-home mom so I can be there to hold her while she naps and to play with her and to raise her the way her daddy and I want her to be raised. She will only be little for so long, and I don't want to miss a single moment, especially the sweet ones when she's finally asleep ;) Yes, I get less done around the house, but to me, the time I spend with my girl is more important. As I was thinking about all these "rules" of raising kids and the comparisons that all of us moms inevitably make, I saw this video from Sadie Robertson of Duck Dynasty:
What a beautiful message! Even though her words are focused on girls comparing their bodies to other girls, body image, and confidence in yourself, her thoughts can also be applied to many other situations, like moms.
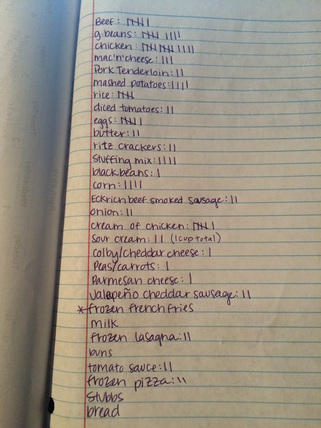
Instead of judging and comparing, mothers need to build each other up. We are all in this together, even if we all do things a little differently. If you are anything like me, you have to live by a budget. Strictly. For us, this month is particularly slim due to some unavoidable expenses. This lead me to plan our meals for the whole month, create a shopping list, and make the massive, only-going-once, dreaded run to that big blue grocery store. I pulled out my binder of our favorite, hubby-approved, make whenever I want recipes and got to work. Here is the calendar I came up with: 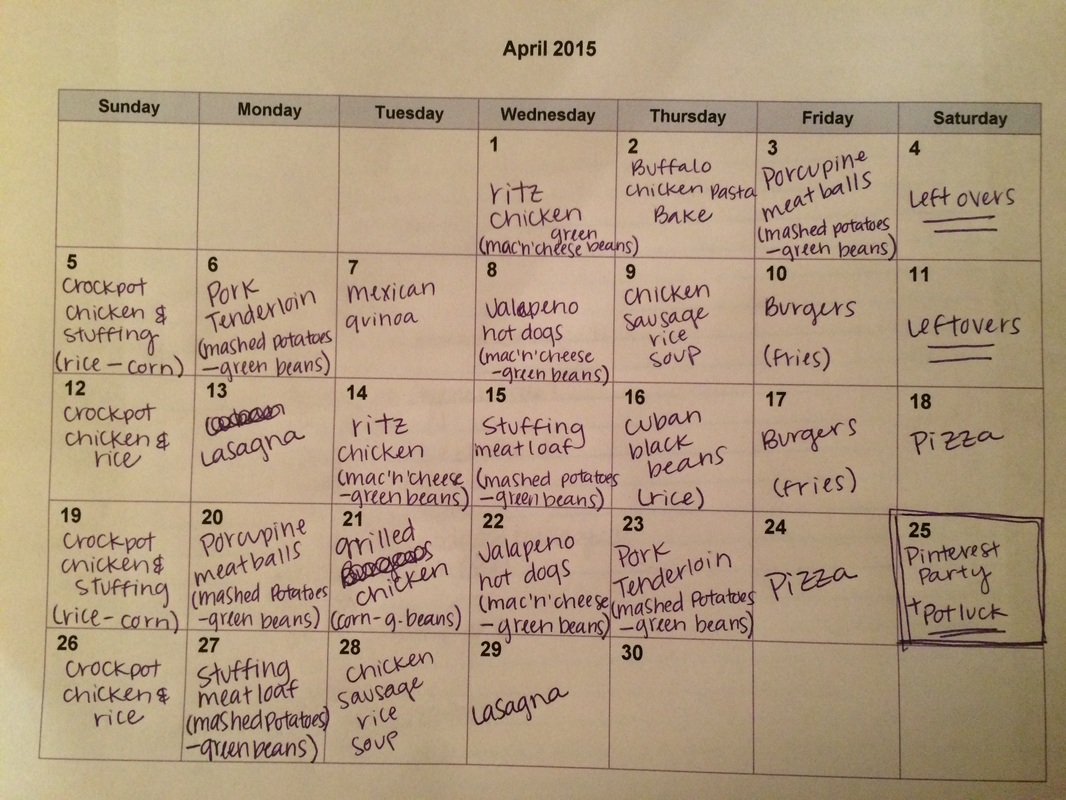 I tried to space things out so we wouldn't have similar things too close together. Also, Sunday nights are our "eat out" days, thanks to a new group of friends, so the Sunday meals are for lunch, set in the crockpot before we leave for worship and ready when we get home! Then to celebrate making it through the month, we will eat out on the 30th (payday!!).
Each tally by the chicken represents two boneless, skinless breasts and "butter" refers to sticks. I had a star next to the frozen french fries because they were optional (I wasn't sure how they would fit into the budget), but since I had enough cash, they made it home with us. |

AuthorMy name is Casey, I am a wife and mother, and I think you should always believe that something wonderful is about to happen. Archives
April 2017
|


 RSS Feed
